
Franklin 3 view
The Smthsonian reports on the PS2
Plans
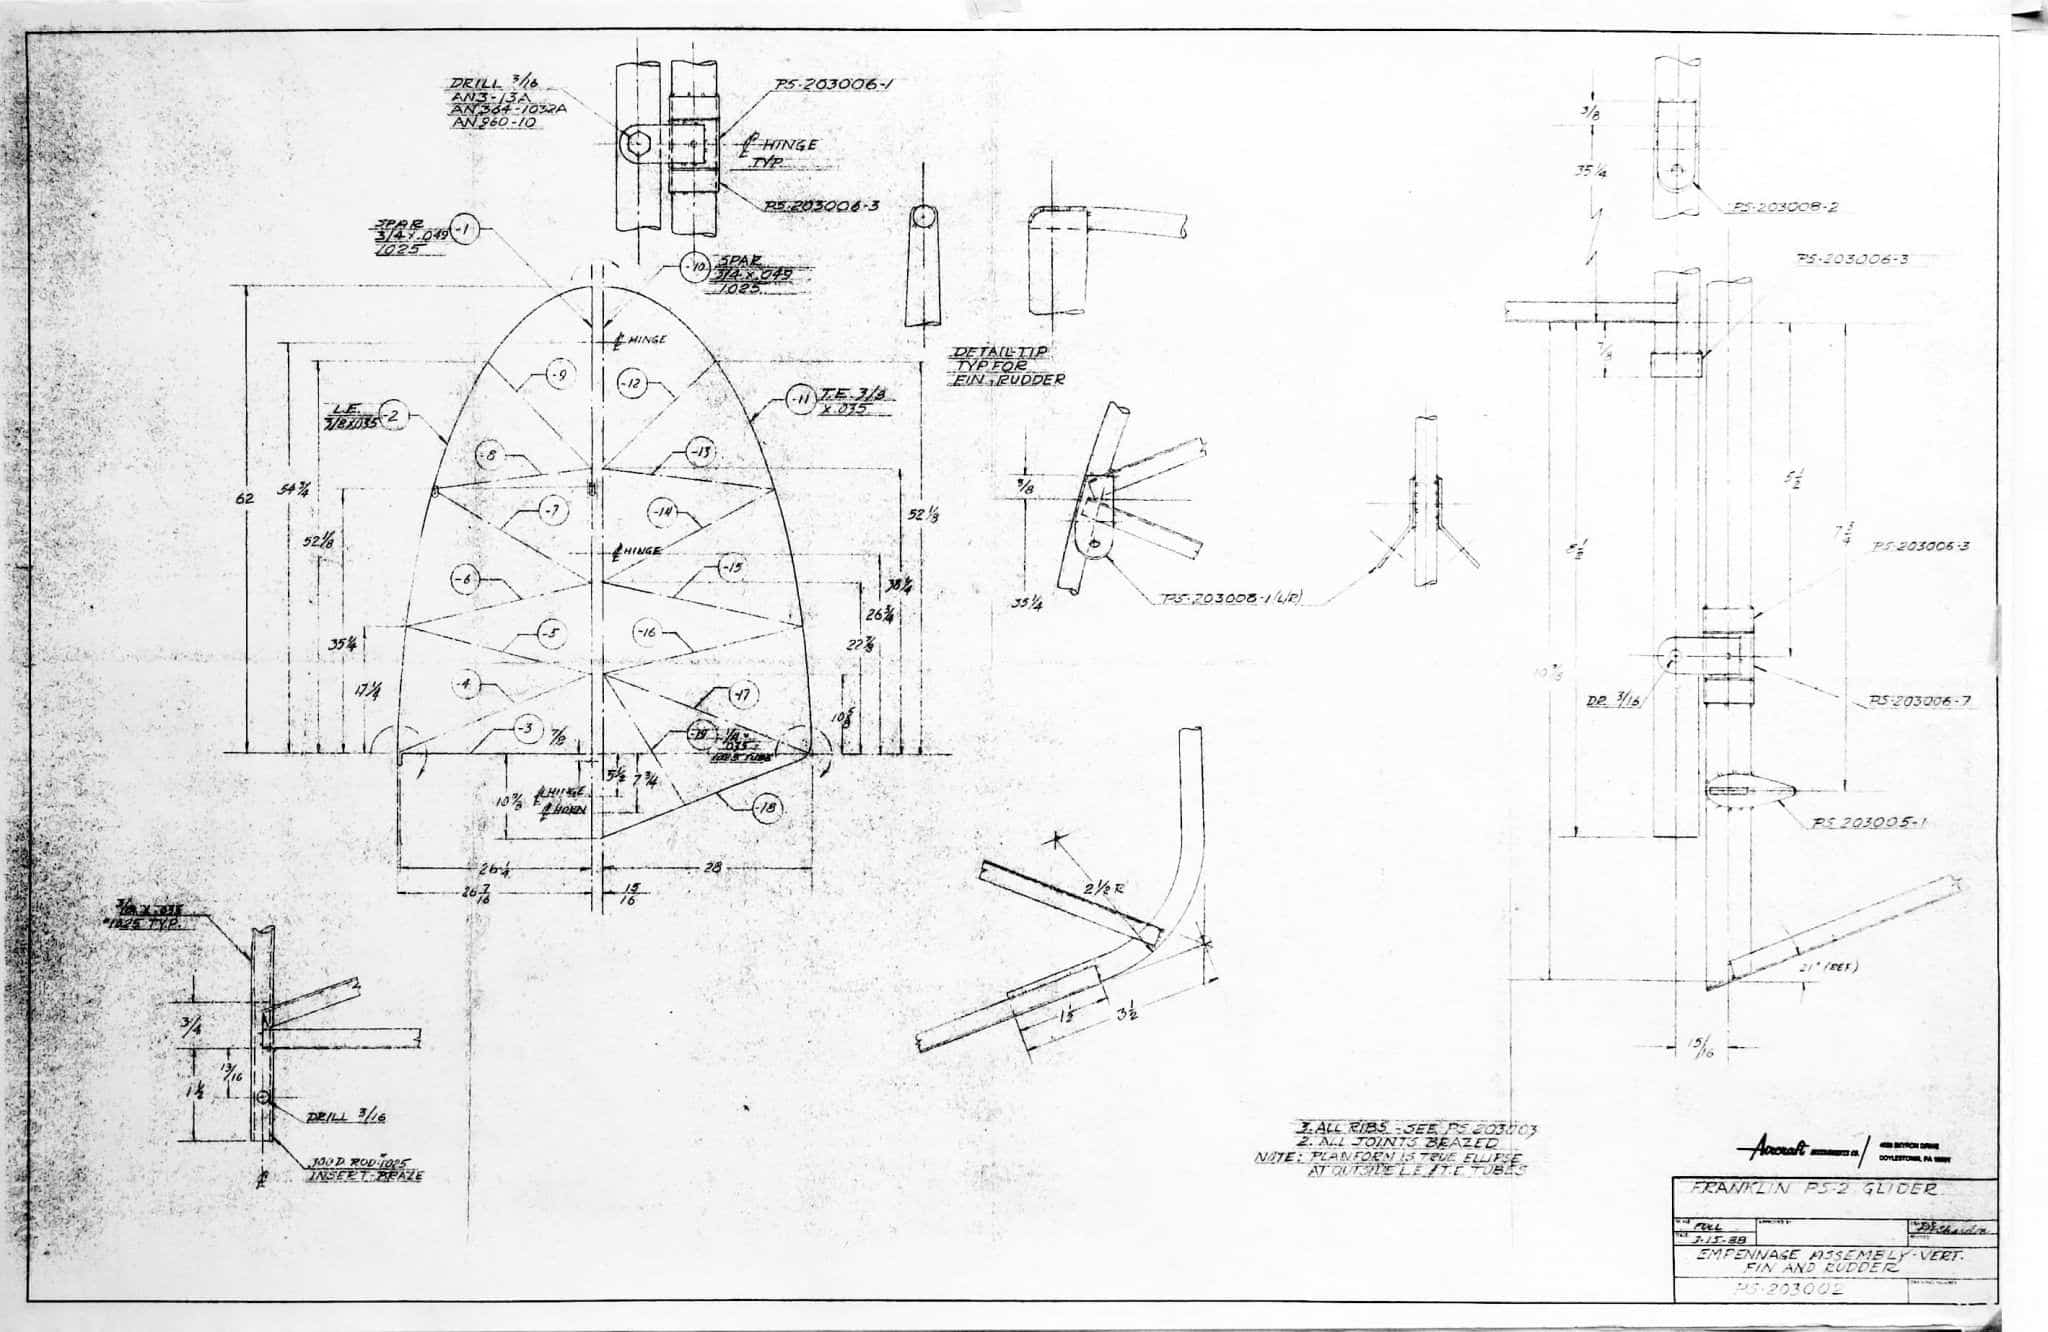
Fin and Rudder

Final assembly
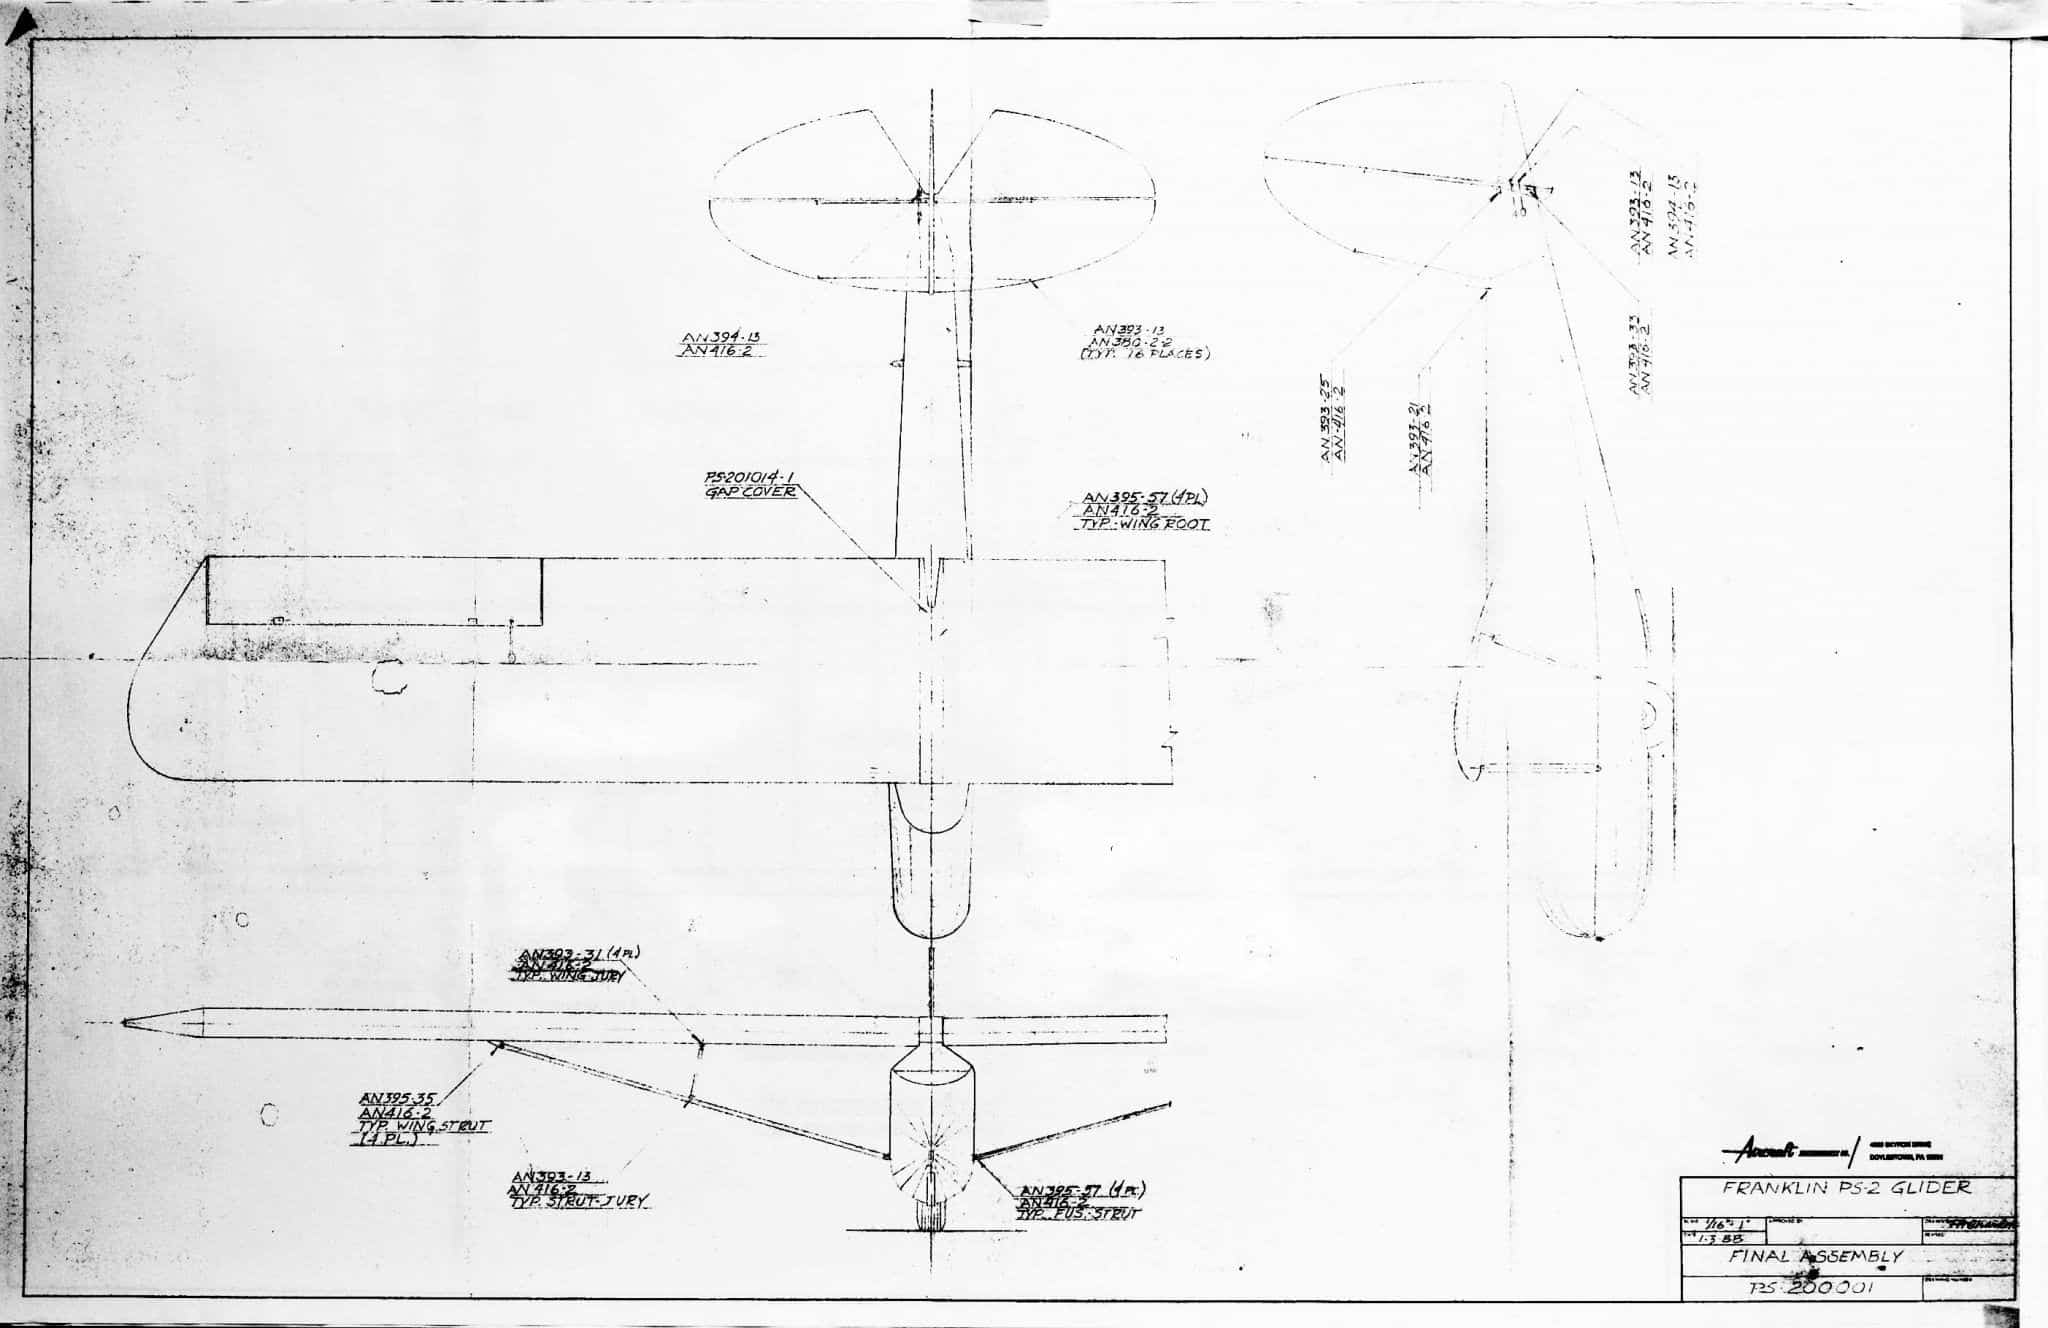
Final assembly
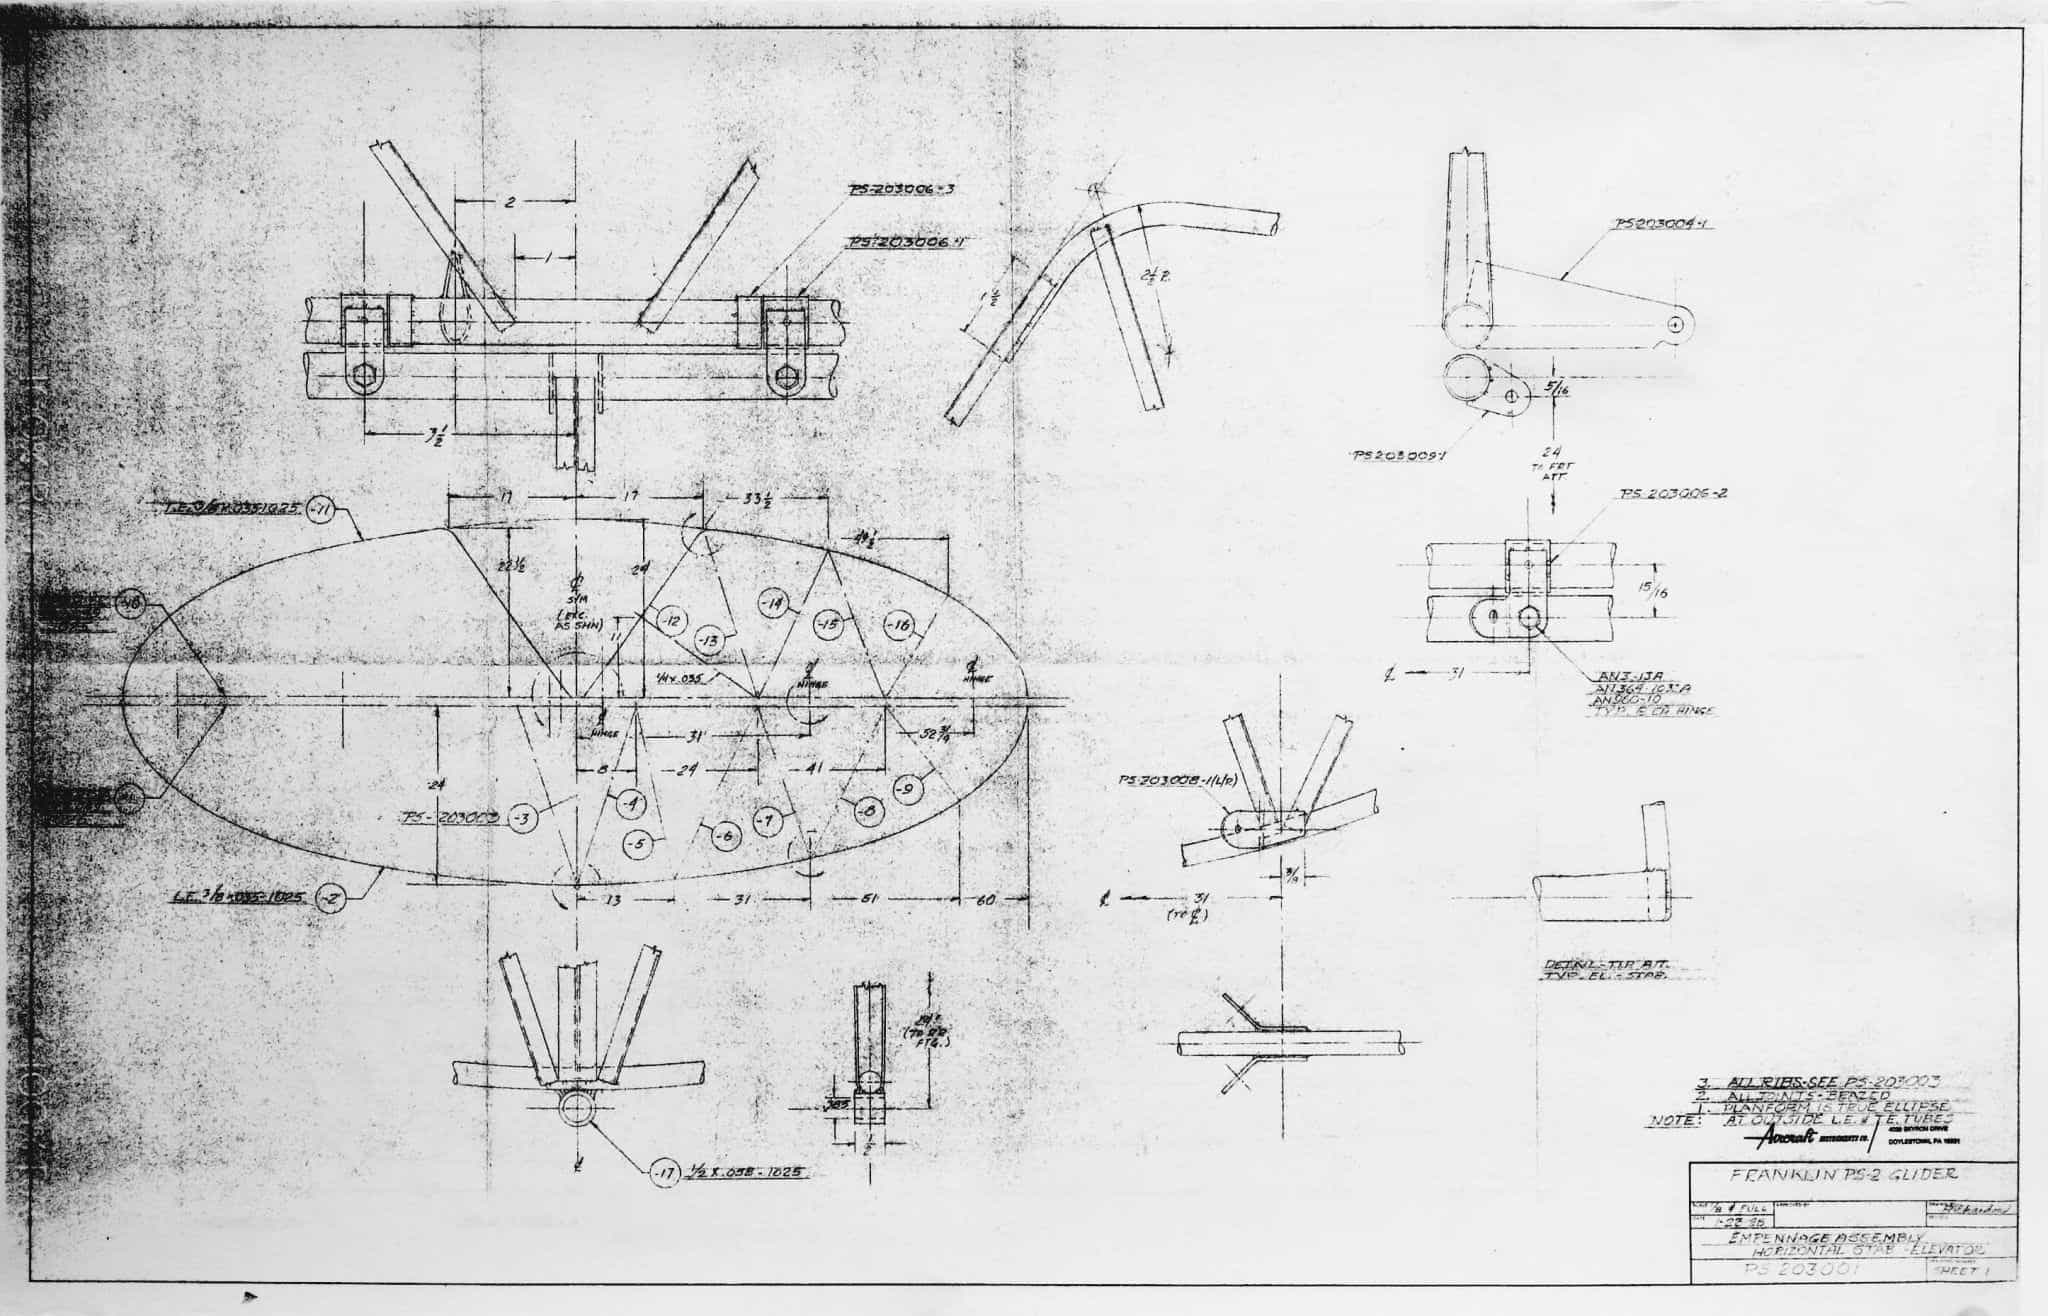
Stabiiser

Wing assembly

Photos
A TAIL OF TWO FRANKLINS
BY GORDON PEARSON
“It’s so ugly its beautiful”
The exact words Joe Feather, one of the four restorers of the Franklin, said when first describing the Franklin. It’s not that Joe doesn’t know the difference between ugly and beautiful, as he owns and fly’s an ASW 20 and a Ka6.

I first learned about the Franklin PS-2, from a photo of the Franklin that was sent to me by Ray Hayes of Skybench. It is well known in my circle of friends that I have a passion for the uncommon, weird, or vintage sailplanes, not necessarily in that order. I don’t know if the photo was a bait to see if I would bite, or just a teaser. At any rate I had to find more about this vintage sailplane, and the Franklin PS-2 project began. I almost never start a building project without first locating enough information on the original to create a complete documentation book; the Franklin might have been the exception. Fortunately for me, the Franklin that was pictured was stored in a trailer located just 40 miles from my home. My good fortune did not stop there. Using my computer, I searched for Franklin PS-2, and found several pieces listing the restorers, and some history on the subject. The restorers were; Chuck Franklin (son of Charles Franklin the founder of the Franklin Glider Corp.), Jack and Dody (Dorothy) Wyman and Joe Feather.

R.E. Franklin
Joe and I go way back in time to the early 70’s, when we flew in just about every sailplane contest located within a 200 mile radius of Ann Arbor, MI. Meeting with him to discuss the Franklin rekindled an old but not forgotten friendship. Joe told me of the blue prints, 3-views, engineering drawings, etc. that were available but needed to be found. Our next meeting, Joe produced a photo album with photos of the complete restoration, and the complete drawings of the Franklin, all drawn to 1/8th scale. All I had to do is have those enlarged 200% and I would have the drawings, now the plans, drawn to ? scale.
These were now my building plans, which I built the ? scale model on. The finished product was not just close to the original, but exact as the original. This is not intended to be a building article, but some of the successes and pitfalls I experienced while building my Franklin. I started the build project with the fuselage. Having Joe’s photos of the bare bones fuselage close at hand, and a large quantity of ? inch oak dowels, the building began. I should mention, I received the first picture of the Franklin in the fall of 2003, the drawings/photo album etc. in the spring of 2004, started construction in the fall of 2004, and completed the model in May 2005. I first assembled a crutch directly over the top view of fuselage, and using epoxy glued the dowels in place. The first challenge came with the curve stringers in the nose. After several failures, the best method was to cut the stringers out of 1/8 inch plywood.
The next step was building the empennage a very straight forward building process, again building right over the drawings. This went fairly fast without any challenges, which should have been a signal of things to come, which they did. More on this later. Before I tackled the wings, which I knew were going to be a real challenge, I thought it was time to have some fun, building some of the small details. The two skids were laminated using 1/16 inch plywood and epoxy over a form cut to the shape of the fuselage underside. Next I fabricated the tail skid using Joe’s photo album as a guide, and soldered brass tubing and 3/32 inch brass stock to the correct size and shape. This little detail is my favorite detail on the finished airplane, and no one ever sees it but me. But I know it is there.
Time to build the wings, which for the most part went well. The real challenge came when I decided to duplicate as close as possible the method of attaching the wings to the fuselage as done on the real Franklin. It would have been easier to build the wings with a 3/8 inch steel wing joiner, rather than the method that was chosen. It is very difficult to explain the method I used, and if my Franklin were going to be winched rather than aero-tow I would have gone with the steel rod method. Getting the proper fit and alignment using the “real” method did not go well at all. Building this wing joining system was the most time consuming and frustrating part of the entire project, and would have a hard time recommending it, although it came out well in the end. I don’t think the trophy is worth the chase. The struts are totally functional, as the majority of launching stresses are taken up by the wing struts. They were fabricated by using aluminum arrow shafts with a 1/8th inch dowel glued to the shaft and covered with a heat shrink tubing, giving it an airfoil appearance.
After all of the construction was completed, and I was happy with the results, it was time to cover. I choose to use Coverite 21st Century Fabric, which worked out well. Jack Wyman had some of the original paint that was used on their Franklin, and offered it to me. The only problem with this paint is; it stinks really badly and the smell never goes away. I was able to purchase the exact paint as used on their Franklin, only in butyrate dope. I just love the smell of butyrate dope; it reminds me of my youth. I had the Daytona White (cream) spray painted over the entire airplane, and using a vinyl masking tape, taped off for the Cubby Sport Green. The next big challenge; when removing the vinyl masking tape that separates the two colors, the tape pulled the Daytona White off with it. This necessitated repainting with a fine brush, all of the removed white, no small job. The finished paint job isn’t great, and probably isn’t noticed by anyone but me.
The next challenge was the graphics. The person who has done all of my graphics was no longer in the graphics business, so I had to find another source. The person I found lives only 50 miles from where I live, is a modeler, and a professional graphics artist, and would be willing to do the graphics in trade for a piece of stained glass. (I do stained glass when not building model airplanes). I must say the graphics on my Franklin really stand out, and just about everyone who looks at it ask; how did I do the lettering? With special thanks to Bob Ness of Lansing Michigan, the finished product looks quite good. Earlier I mentioned the challenge when building the empennage, things were going too well. I don’t know how I could have missed this point, as it was so obvious to me when I started to really compare my finished Franklin with the real Franklin. I had helped assemble their Franklin for a photo op, and had seen countless photos, and had taken many myself, and still missed it. The rudder and fin on my Franklin are quite different than the real Franklin. The more I looked at it the greater the difference, how could this be? I built mine on the original drawings and they were exactly as drawn. The blueprints were redrawn in 1988, and they were drawn with the original rudder/fin of the 1928 version. Some early Franklin photos clearly show the differences between the 1928 and the 1930 Franklin, which was when theirs was built. My options were very simple, I could leave it the way it is, and hope no one will notice it, or build a new rudder, with new graphics. I choose the latter. The fin will require modification to the 1930 design somewhere down the line. After all, I know that it is not right. Up until this writing just the restorers and I knew about the differences—Now all of your readers will know, as well.
 I took the Franklin, Pionyr and WACO CG4 to the Woodcrafters bash at the AMA field in Muncie, IN in late may, to fly scale aero-tow. The weather is always predictable in this part of the world, this time of the year. Predictable in that you can’t predict what it is going to be. You can almost count on the wind to blow with vengeance, and probably will rain at least one day of the event, maybe more. It did. I assembled the Franklin, had it sitting on the flight line, and the wind blew so hard it unwound one of the turnbuckles on the wire between the fin and stab. It took me two days to figure out how to correct the challenge, without a turnbuckle. With this challenge corrected, it was time to fly! Not so fast, somewhere between the original assembly and the corrections, the transmitter was left on, and the battery was completely drained. To put the readers to rest, what kind of frequency control do we have at this gathering? Only one person is assigned per frequency, and I was the only one on this channel. If anyone were to be “shot down” it would have been me, and it didn’t happen. I looked at this new challenge and decided it was an omen, so opted not to charge the transmitter battery and fly the Franklin. The Franklin won the “Peoples Choice Award” as voted on by those in attendance, who chose to vote. I flew the WACO and came in at a close third place. This event was well attended by many different types of scale sailplanes, all of them are built up wooden sailplanes, no composites allowed.
I have built quite a few (more than a couple) scale sailplanes through the years, and have never had the opportunity to work with the original drawings, talk with the people who basically reconstructed the entire project, and actually sit in the sailplane that I was modeling. To say it was a thrilling experience would not do justice to my feelings. To top off the total Franklin experience, I took my Franklin to Harris Hill in Elmira, NY, to the Vintage Sailplane Association gathering in late August of this year; to be photographed with the crew of the restoration and their Franklin. Jack and Dody Wyman have donated their Franklin to the Sailplane Museum, which will be displayed for all to view. Up until their donation to the Museum, it still may retain the oldest flying glider in the world, title.
As a post script: The word “challenge” was substituted for the word “problem” in some situations.